The ultimate backup script for web based projectes

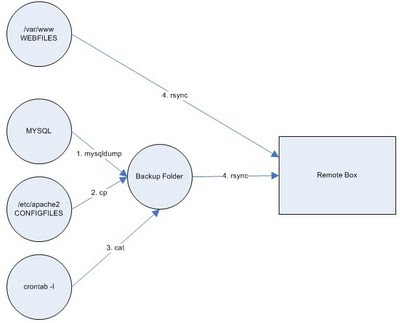
The goal of this backup shell script is to take, all the webfiles, config files, crontab and mysqldumps from the source server to a backup server. The backup must be programed daily in the crontab of the source server.
What we exactly do?
First we do a mysqldump for every database we are interested in, we do a different backup for every weekday, we'll have a dbname1.sql for monday, dbname2.sql for tuesday, and so on.
As long as the backup script must be placed in the backup folder, we'll be keeping all the .sql files in the backup folder already.
In a second step we do a gzip of this .sql files
Then we'll generate a crontab.txt in the backup folder with the content of the crontab of the user.
Afterwards we copy the apache configuration files apache2.conf and the whole folder of sites-available
Finally we rsync the files of the webroot folder and the backup folder to the remote server.
The first time you run the script it will take longer because the full webroot folder must be transfered, but the next times it only copy the incremental changes done since last execution.
When you've tested the script you can program a crontab like this:
MAILTO=your_email
00 12 * * * cd backup_folder;./backup.sh
The script (/user/home/backup_folder/backup.sh):
FECHA=`date +%u`
DB=dbname1
echo starting backup $DB $FECHA
mysqldump --user=user --password=password --host=host \
--default-character-set=utf8 $DB > $DB$FECHA.sql
echo done backup $DB $FECHA

DB=dbname2
echo starting backup $DB $FECHA
mysqldump --user=user --password=password --host=host \
--default-character-set=utf8 $DB > $DB$FECHA.sql
echo done backup $DB $FECHA

echo starting to gzip files
gzip -f *.sql
echo done gzip files

echo starting copy of config files
crontab -l > crontab.txt
cp /etc/apache2/apache2.conf .
cp -R /etc/apache2/sites-available .
echo done copy of config files

echo starting rsync with remote host
rsync --verbose  --progress --stats \
--exclude "*.log" --exclude "cache_pages/" \
--compress --recursive --times --perms --links \
/var/www remote_user@remote_host:

rsync --verbose  --progress --stats --compress \
--recursive --times --perms --links \
/user/home/backup_folder remote_user@remote_host:
echo done rsync with remote host
Line by line explanation:
1. FECHA=`date +%u`
2. DB=dbname1
3. mysqldump --user=user --password=password --host=host \
--default-character-set=utf8 $DB > $DB$FECHA.sql
1. Creates a shell variable with the number of weekday, $FECHA will be 1 for monday, 2 for tuesday and so on.
2. Creates a variable with the name of the database, you must replace
3. mysqldump do a backup of your database in SQL format, replace user, password and host by your real data and be aware of the --default-character-set=utf8 you can use this is your database is in utf8, otherwise remove this option. The last part > $DB$FECHA.sql constructs the name of the .sql file that is generated (in our example enterprise_prod1.sql if it's monday, enterprise_prod2.sql if it's tuesday and so on)
-----------
4. gzip -f *.sql
4. gzip all the .sql files, after the mysqldump we'll have only one .sql file, after this line the .sql file will be transformed into a .sql.gz file (enterprise_prod1.sql.gz for example)
------------
5. crontab -l > crontab.txt
6. cp /etc/apache2/apache2.conf .
7. cp -R /etc/apache2/sites-available .
5. Create a file called crontab.txt with the content of the crontab of the user.
6. Copy the apache config file (change your path as needed)
7. Copy the full folder of sites-available to the backup folder (change your path as needed)
-------------
8. rsync --verbose --progress --stats \
--exclude "*.log" --exclude "cache_pages/" \
--compress --recursive --times --perms --links \
/var/www remote_user@remote_host:
9. rsync --verbose --progress --stats --compress \
--recursive --times --perms --links \
/user/home/backup_folder remote_user@remote_host:
8. Rsync all the files in the document root /var/www (change the document root as needed) recursively and with compression, maintaining the files timestamps and copying links. You can see that I've excluded a couple of things, the .log files and a folder called cache_pages that doesn't need to be backed up. Change the remote user with the name of the remote user (if it's different from the source user) and change remote host with the IP address or the name of the remote server (remote.omatech.com for example)
9. Rsync the backup folder, change the backup folder with the absolute path of your source backup folder.
In the steps 8 and 9, rsync will create in the home of the remote user in the remote server a www folder with the contents of the document root of the source server and a mirroring backup folder.
Notes:
TAKE THIS SCRIPT WITH NO WARANTY, test it line by line carefully.
To avoid rsync to ask for the password of the remote user you must do the following:
Create a ssh key in the source server:
ssh-keygen -tdsa
Press enter to all the questions and take note of the generated file id_dsa.pub (usually in the .ssh folder of the user (beware that the .ssh folder is hidden you must use ls -la to see it)
copy the content of the file to the remote server, to the folder .ssh of the backup remote user to a file named authorized_keys, for example you can do:
Source server:
ssh-keygen -tdsa
// Enter, enter, enter
cd
cd .ssh
cat id_dsa.pub
// Copy all the content shown
Remote server:
cd
cd .ssh
cat >> authorized_keys
// Paste the content copied before
Ctrl+D (to close the file)
cp authorized_keys authorized_keys2
chmod 0600 authorized_keys authorized_keys2
cd ..
chmod 0700 .ssh

No hay comentarios:
Publicar un comentario